There is nothing quite like cooking over a fire. You don’t need a stove or grill. You just need dry firewood and a campfire cooking kit. With that you can fry, roast, steam, boil, or bake your food.
I would argue that barbecue enthusiasts, campers, and preppers should all learn how to cook over a campfire. It’s a lost skill and art.
When we go for extended camping trips, the traditional camping food starts to get old, particularly by the end of summer. Even barbecued food at home on your deck can get old. Cooking over a campfire adds a whole new method of cooking and countless new recipes to go with it.
Knowing how to cook over an open fire (and having the equipment to do it well) is also a homesteading/survival skill that could be called upon if or when the power goes out. There is a sense of self-reliance that comes in knowing a hearty meal is not dependent on the kitchen range, oven, or even gas grill. And if societal collapse were to ever hit, knowing how to cook meals for people with nothing more than firewood would be invaluable. Lumber camp cooks were the highest paid men in camp for a reason!
The campfire cooking kit equipment I’m suggesting here assumes you are cooking while car camping or at a fixed location. These are not items you’re going to carry with you for cooking while backpacking. There’s other cooking gear for that.
What You Probably Need for a Campfire Cooking Kit
What works for me may not work for you. You may needs fewer pieces to meet your needs. No problem. These are just the items that should work for most people. The best part is you can buy and build your kit incrementally over time.
In fact, that’s what I’ve done, adding as I go and my open fire cooking skills expand. I like this strategy because you don’t have to spend a lot of money all at once, and you can even offer some items as gift ideas around the holidays.
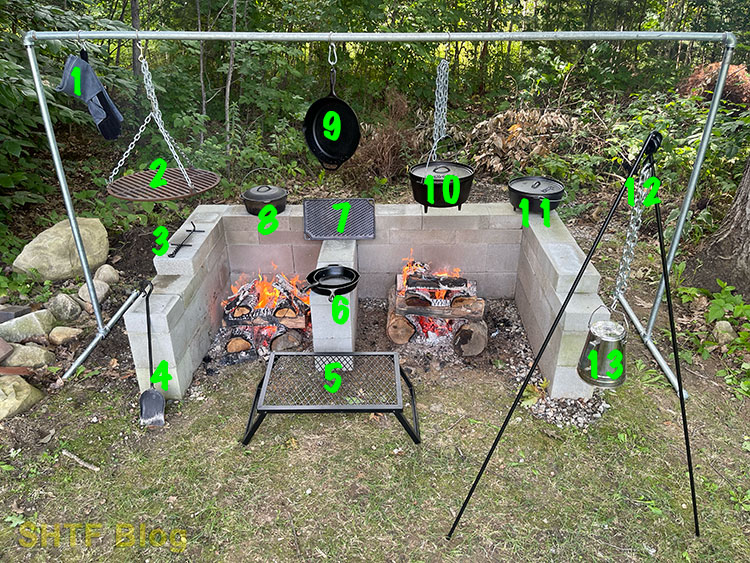
I’ve labeled everything I’m going to list in the picture above. I’ll then list some other items that I think are nice to have toward the end of this article. If you’re wondering how I built the concrete block fire pit in the picture, read this post. If you want to know how I built the cooking rack system that everything hangs off, read this post.
1 – Welding Gloves
Start with safety. You can’t play with fire without proper hand/forearm protection. Having a solid pair of welding or fireplace gloves will allow you to get your hands into the fire to move hot cast iron around, adjust burning sticks and coals, etc.
- 【EXTREME HEAT RESISTANT PROTECTION】- Outermost layer:Genuine Cowhide Split Leather . ntermediate layer:a composite product by laminating a kind of high temperature resistant Air-isolated Aluminum Foil and a flame retardant cotton cloth . Inner layer:a 100% soft insulated cotton lining.flame retardant thread stitching.for advanced heat and cold resistance,sweat absorbent,breathable,allergy free.They are guaranteed to withstand extreme temperatures up to 932°F(500℃).
- 【EXTREME WEAR RESISTANT PROTECTION】- The Gloves are made from 1.2mm thick and soft shoulder split natural cowhide leather which is heat resistant,wear-resistant,puncture resistant,cut resistant,oil resistant.Reinforced double leather stitching and high strength sewing on the palm of the hand,not easy to fall off.
The gloves I use in the photo are 16″ welding gloves I bought off Amazon. They are rugged, offer plenty of protection, cost less than $20, and stow easily inside my Dutch oven when not in use. You can find comparable gloves at home and hearth stores, welding supply stores, and even some hardware stores. There are fancier/pricier gloves available, but these work just fine for me.
2 – Grill Grate
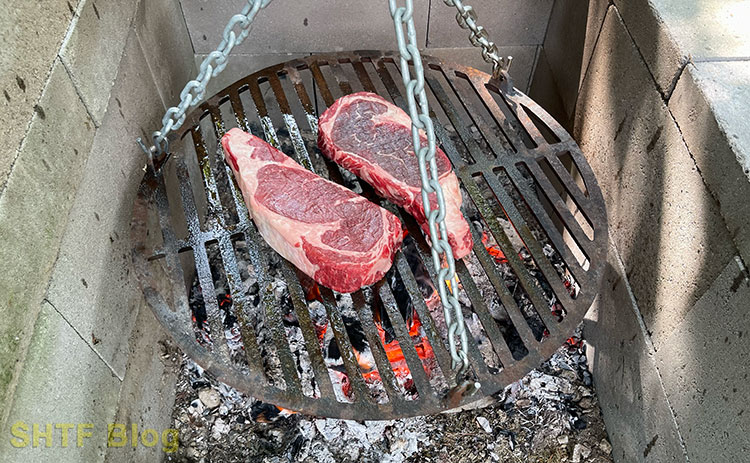
A grill grate is a must. Admittedly, mine is more grate than most people will need, and I had a heck of a time trying to find it. I wanted a heavy, steel grate with 3 attachment points that would accommodate S hooks for hanging it. I searched the big box stores, Amazon, online outdoor retailers, and even Craigslist and Facebook marketplace. No luck.
Eventually I found one on Etsy from someone that forges them in Eastern Europe. I paid more than I probably should have to get it shipped to the U.S., but it’s a serious grate that I couldn’t find anywhere else.

It’s perfect for my outdoor cooking setup, but it’s also too much grate for general car camping use. It’s too heavy and too cumbersome. I purchased a second, lighter grate for those purposes, and in a pinch I can use it as a second grate for my home setup.
- 【COMPACT DESIGN】 Titanium Grill. Made of premium titanium. It is scratch-resistant, heat-resistant and it is not easy to be deformed and rusty.
- 【LIGHTWEIGHT & PORTABLE】Camping BBQ Grill is mini size, the grill is 25.5cm*16.5, only 119g. This grill is specifically designed by experts for bushcraft and expedition camping. Engineered to fit into most backpacks. Small package is convenient to carry. It is a must have for any adventurer.
This cheaper titanium grill grate that I purchased is great because it not only weighs much less and it’s portable, but it has a rectangular shape. That shape makes it better suited for resting on blocks or rocks positioned on the side of a fire. There is no need to hang it (though I bought cheap titanium cables to hang it as well).
3 – Lodge Dutch Oven Lid Lifter
This item is less of a priority than other items on the list, but it’s inexpensive and if you do any serious amount of Dutch oven cooking you’ll appreciate having it. You will have to lift your Dutch oven and/or the lid out of the fire throughout the cooking process. The lid lifter allows you to do that without putting your hand too close to the fire.
- With the Lodge Lid Lifter, you can safely lift hot lids full of coals and move dutch ovens from the fire to the table
- T-bar design fits all Lodge Dutch ovens
An alternative to a lid lifter is a simple hammer. Use the pry end of the hammer to lift the lid or the oven. Most people already have a few hammers laying around the house, so if you’re new to outdoor cooking or have a tight budget, start by using a hammer. You may find a hammer works just fine.
4 – Coal Shovel
Cooking over an open fire relies less on the actual fire and more on the coals generated from the fire. You need a coal shovel to work with ultra-hot coals. You have to move them around, add to your coal bed, move coals out of the coal bed, etc. Eventually, after cooking is done and the fire is extinguished, you’ll also have to remove the ash. This is where a simple coal shovel comes in.
- IT FROM XUQCAH MATERIAL AND FOIMOJSK PARTMENT AND Thurder LOVER
The shovel pictured above is one I had been using with my fireplace during winter months. It’s more decorative than is really necessary for campfire cooking (and more costly). I’ve since upgraded (downgraded?) to a less expensive, simpler shovel that has a bigger mouth. At under $20 I’m not worried about it being left out next to the firepit. It can get dirty and gross. It doesn’t matter.
5 – Portable Grate with Legs
It’s good to have options. No, it’s grate to have options! Having a portable grate with legs lets you take your grate on the road and use it directly over hot coals. This can be used in a larger outdoor kitchen setup as a backup or second grate. It’s also perfect for weekend getaways to a campground site.
- ★【OVER FIRE & CAMPING TABLE】: Can serve as a handy "camping table" for gear around your campsite. it can also placed as grill grate as well as burning stove supporting over your open fire for cooking. Please note that not suitable for direct contact grilling.
- ★【DIAMOND-SHAPED MESH GRILL TOP】: The camping cooking grill features a steel mesh grill top, which allows heat to flow through from a campfire below. Perfect for your car camping or fire pit needs and fit over the fire perfectly, make your camp cooking much easier and convenient.
6 – Different Sized Cast Iron Skillets
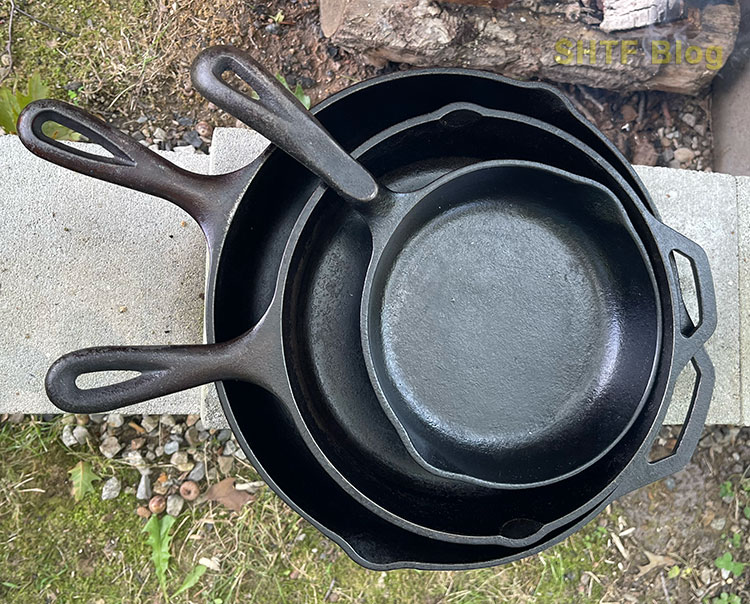
Any prepper, chef, or outdoor enthusiast knows the value of a cast iron skillet. Once you start using a cast iron skillet you learn the value of having several cast iron skillets. These skillets have stood the test of time, from hanging off wagons in the westward expansion to use in high-end restaurants.

The Lodge name appears here again (all but a few of my cast iron cookware pieces are from Lodge). Lodge is the most recognized, most widely sold brand of cast iron cookware in America. It’s a family-owned business that’s been operating since 1896.
- Durable Cast Iron Construction: Made from heavy-duty cast iron for long-lasting use and even heat distribution.
- Set of 3 Skillets: Includes 12 inch and 10.25 inch skillets for versatile cooking.
Considering their longevity, cast iron skillets are reasonably priced. You just need to know how to clean and care for cast iron, because they don’t respond well to conventional dish cleaning techniques.
If cost is a concern, you can often find old cast iron skillets at lawn sales. They might need some reasoning, but that is not a problem. Even “pre-seasoned” skillets should be re-seasoned (and re-seasoned again) before regular use. If you’re lucky, you’ll even find the kind of old cast iron cookware that was finished by hand, a production method that has since gone by the wayside but one that yielded a much smoother pan. They don’t make ’em like they used to!
7 – Cast Iron Griddle
Griddles are a lower priority than a few good skillets, but they have their place in outdoor cooking. The griddle I have has a smooth griddle side and a lined grill side. Working with some foods and recipes is easier on a griddle because of its rectangular shape and no tall sides. Imagine, for example, trying to cook kabobs in a skillet.
- Seasoned with 100% natural vegetable oil
- Unparalleled heat retention and even heating
The other good thing about a rectangular griddle is the same advantage it has as the rectangular grille grate – you can prop it up on its sides with concrete blocks, bricks, or stones. Set your coals underneath and you have everything you need to cook outside, no hanging system needed.
8- Flat Bottom Dutch Oven
Dutch ovens, much like skillets, come in a variety of shapes and sizes. The flat bottom Dutch oven is what most people consider to be the standard Dutch oven. It doesn’t have any legs. Flat bottom Dutch ovens are more versatile because you can use them in an oven rack or hang them over a fire. They’re also less expensive than legged Dutch ovens.
If you’re buying your first Dutch oven, or only plan to buy one, get one with a flat bottom.
- 🥘The best material:This cast iron dutch oven with lid matte black interior offers enjoyable cooking without safety worries.This material provides unparalleled heat retention and heats evenly, allowing you to use this cast iron dutch oven to cook things to.
- 🥘Various cooking methods:This cast iron dutch oven has good thermal conductivity,The flanged lid holds hot coals and inverts for use as a griddle,The legs will keep the griddle steady over the campfire.The portable camp stove is perfect for braising, stewing, boiling.
My other piece of advice is to skip the Dutch oven with the rounded lid (like what I have in the picture above). Get a flanged lid that will accommodate hot coals on the top. This allows you to apply heat from the bottom and top, creating an “oven” effect.
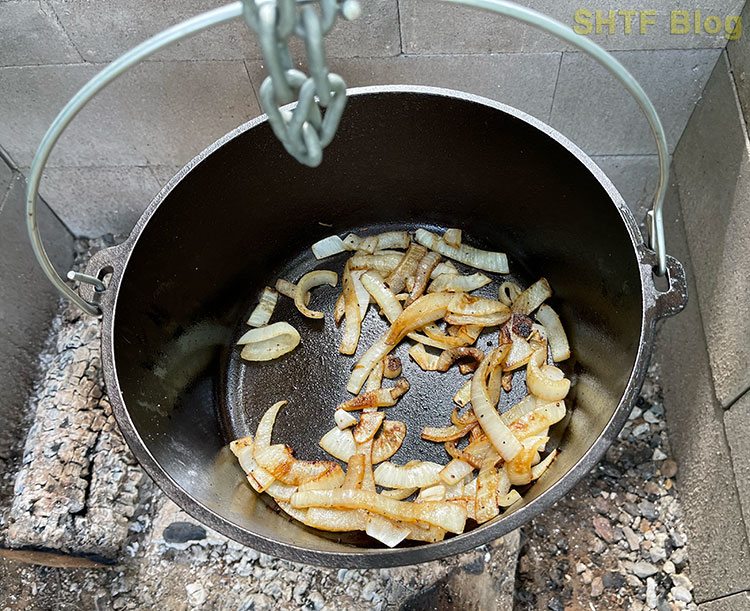
10 – Deep Dutch Oven
Before a got into outdoor cooking I thought a Dutch oven is a Dutch oven. I was wrong. Wider Dutch ovens are clearly designed for bigger meal prep, but that’s not necessarily true for deep Dutch ovens. Deep Dutch ovens are better for cooking stews, as an example. The space inside the oven creates makes it better for baking. There is more room inside for foods that rise, and the greater space inside means the oven heats more slowly, allowing you time to properly work the coals.
- 8 QT. DEEP CAMP DUTCH OVEN. The Lodge portable “camp stove” is the pot that does it all. The flanged lid holds hot coals and inverts for use as a griddle. The integral legs allow the oven to sit perfectly over the campfire.
- PRE-SEASONED COOKWARE. A good seasoning makes all the difference. Lodge provides pre-seasoned cookware with no synthetic chemicals; just soy based vegetable oil. The more you use your iron, the better the seasoning becomes.
That extra depth is also good for containing boiling foods, reducing the chances of spillovers and splatters. They’re better overall for simmering and stewing.

11 – Camp Dutch Oven
What’s a “camp” Dutch oven? One with legs. These are better for cooking directly on top of coals in a campfire. The legs set the oven flat on the ground and the space between the legs and the bottom of the oven is where you place the coals. You can see in the picture that my deep Dutch oven is also a camp Dutch oven. The one labeled #11 is a camp oven, just not as deep. If you’re looking to try something other than Lodge, Cabela’s has their own brand of camp Dutch ovens.
12 – Lodge Tripod
The Lodge cooking tripod is great. It is ultra easy to set up and collapse. It comes with a chain and a hook. The tripod allows you to take your Dutch oven, cooking grate, Billy pot, etc. camping with you and use it for cooking. These tripods like like they’re straight out of the Wild West! I bought mine from Cabela’s, but it’s also available on Amazon.
- Tall Boy tripod features 60" legs with 36" chain
- All-steel construction with high-temp black finish
The tripod is also great if you are new to cooking outside and don’t want to build the elaborate system I constructed. The tripod is great to use at home or at a campground. They are reasonably priced and will last a lifetime.
13 – Percolator
Last but certainly not least – coffee! Nothing beats a hot cup of coffee while in the outdoors. The smell, the heat, the flavor… Advanced campers and coffee aficionados can even ramp up the campfire cooking experience by roasting green coffee beans before brewing!
- STAY CAFFEINATED: Coffee? Always! The Glacier stainless percolator coffee maker helps you attain your caffeine needs and is great for use on stovetops and campfires
- A SIGHT TO SEE: Watch your coffee brew for precision cook-time through the percolator’s PercView glass dome. We believe that coffee isn’t just a drink, but an experience
There are many different percolators on the market to choose from. My advice, for outdoor cooking, is to get one that is made from stainless steel, has a hook to hang it, and does not have a wooden handle. You’re going to be cooking over fire after all!
Honorable Mentions
The items I listed above are my go-to products for outdoor cooking. There are a few other nice to have, honorable mentions, however.
Aluminum Foil
Heavy duty aluminum foil is great to have for making cleanup easier or for cooking directly on hot coals. You can find plenty of recipes online that involve cooking everything wrapped inside tinfoil. These are great options for preparing in advance of a cooking trip. Get everything prepped at home and just toss the packets onto the grill or campfire at camp.
Billy Can
Ever hear of a Billy can? It has its roots in campfire cooking. It came into being in Australia where stainless steel cans were converted into pots used for boiling and cooking in the outback. Today’s modern Billy cans are constructed specifically for this purpose with locking lids.
- KIT INCLUDES: Genuine Zebra Loop Handle Pot + Inner pan + 2 Firebox (pat pend) Spring Tempered Stainless Steel Two Function Handle Clips (search YouTube: "Bomb Proof Billy Can")
- LOCKING BAIL HANDLE - These Zebra Loop Handle Pots are equipped with our (pat pend) stainless steel handle clips which allow you to manually lock the handle in the upright position to keep it out of the campfire heat and for easy pouring (when the handle is locked upright the pot lid is unencumbered, free to be easily removed or replaced)
I own the Firebox Billy can, and it’s great for boiling water in the outdoors, whether for cooking, cleaning, or purifying.
Don’t want to buy a Billy can? No problem – you can make your own. Just make sure to use a can that was not used to house chemicals!
Reflector Oven
Advanced outdoor cooking chefs can actually use a campfire to bake foods, and not just through a Dutch oven, but with a reflector oven. They can be purchased, but their design is so simple you can make one yourself. Warning – baking alongside a campfire takes a lot of practice. Don’t get discouraged when half of the muffins come out burnt and the other half are undercooked. Rotate often!
Pie Iron
I don’t own any pie irons, but I’m not much of a dessert guy. I would take a second helping of a good, hearty meal over dessert any day. For people that enjoy a sweet treat, having a few pie irons will complete your outdoor cooking experience.
- Set of 2 pie irons to help cook 2 extra large treats over a campfire
- Each cast iron head has an extra large chamber, for creating larger sandwiches
Kids love them, too!
Summary
Outdoor cooking is an art form. Building a campfire cooking kit is essential, but it can be done incrementally as your budget allows and your skills build. The most important thing is to just get out there and start messing around with some simple recipes. If you are starting new, my advice is to start with a cast iron skillet, Dutch oven, and a tripod with chain to hang it from. Those three items will cover a lot of your needs. Of course, fire resistant gloves are a good “touch” as well.
What are your thoughts? Did we miss something? What advice or questions do you have? Let us know in the comments section.


2 comments
Good ideas for the fire! I have a few of these items. The percolator is a little tricky on a camp fire. Over boils some times. Leaves coffee grinds in the brew. As far as pie irons, they make more than desserts. We use them to make different types of sandwiches. Ham and cheese, pepperoni, salami etc… We also use them to make pancakes. We put bisquick (or pancake mix) into them with blueberries, strawberries, walnuts or any kind of meat to have a good hearty meal!
Solid point on the pie iron. Yes, the percolator is tricky. It’s easy to put too much water in it and it takes practice to know when to take it off. It’s sometimes easier to just bring water close to a boil and do a pour over.